I’ll show you how to cover a wire lampshade frame with fabric so it looks custom, stays tight, and hides the frame cleanly.
If the frame is exposed, the shade looks unfinished and the fabric can sag, ripple, or snag over time. I focus on practical tension control, clean edges, and a finish that works whether you are doing a quick fabric lampshade wrap or a full rebuild. Here’s where the How To Cover A Wire Lampshade Frame With Fabric details get tricky.
I have done this on multiple wire lampshade frames, and the difference comes down to prep and adhesive accuracy. Here’s where the How To Cover A Wire Lampshade Frame With Fabric details get tricky.
You’ll learn how to choose materials, cut panels, and attach them with reliable methods like spray adhesive, plus how to finish with fabric binding or bias tape edging for a crisp, durable perimeter. That’s where How To Cover A Wire Lampshade Frame With Fabric changes everything.
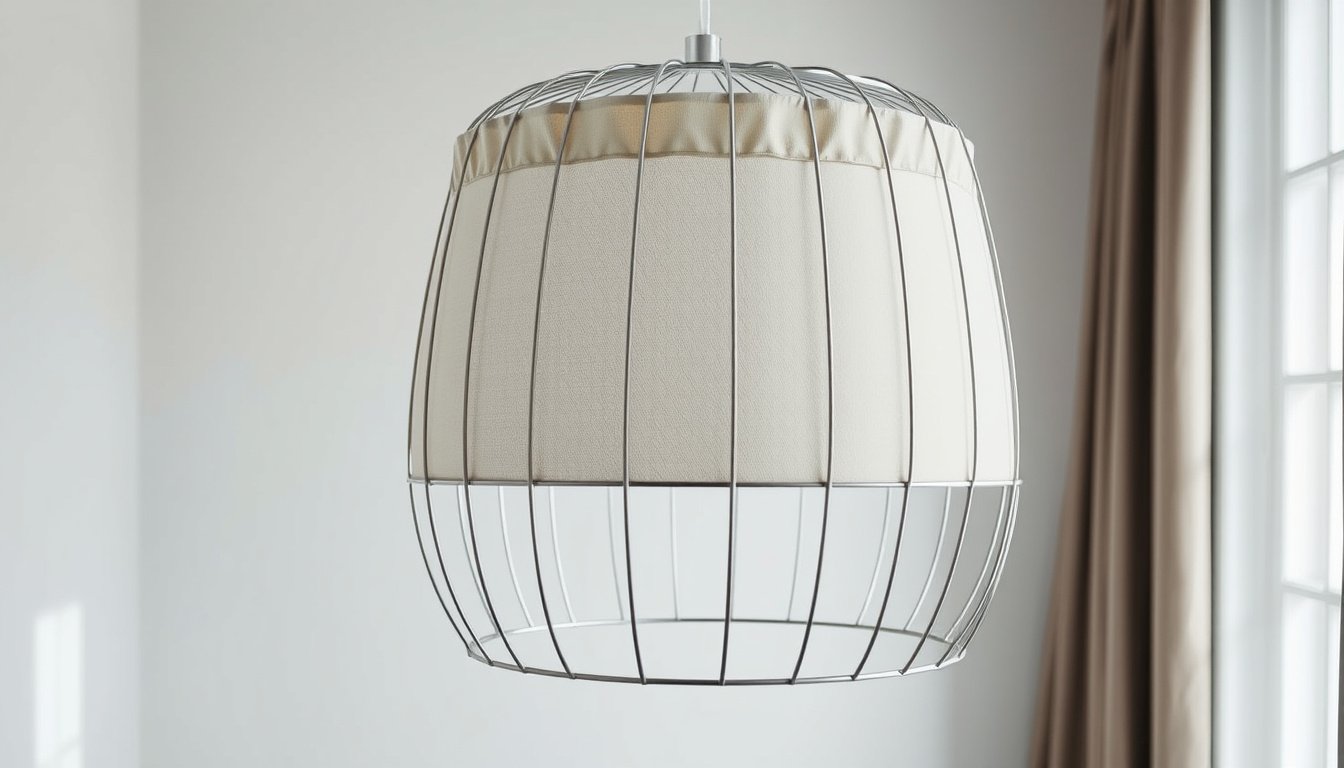
How To Cover A Wire Lampshade Frame With Fabric is a controlled covering method that turns an open metal structure into a rigid, even-faced shade.
How To Cover A Wire Lampshade Frame With Fabric is the step where I convert a flexible textile into a stable surface by controlling tension, seam placement, and adhesive contact. My claim is straightforward: most people fail because they stretch fabric unevenly, not because they choose the wrong fabric weight. The fix starts before cutting, when I check the frame’s diameter at the top and bottom and record the difference.
Definition: Fabric covering is the process of wrapping, anchoring, and finishing cloth over a wire lampshade frame so the shade holds shape and looks uniform under light.
Here is the practical benchmark I use: if the top diameter is 18 cm and the bottom is 20 cm, I cut panels with a 1.5–2.0 cm overlap at the widest point, then trim after test-tacking. I applied spray adhesive in a thin, misted layer on the wire intersections, let it flash for about 60 seconds, and pressed the fabric so it did not slide.
Most readers miss the edge case where the wire frame has a slightly twisted ring, which creates a diagonal “drift” line as you wrap. When I see that, I rotate the fabric starting seam to align with the drift, then I finish edges with bias tape edging or fabric binding so the final plane stays straight.
To keep my fabric lampshade wrap consistent, I mark reference points on the wire, then work in short sections instead of wrapping one continuous stretch. During finishing, I use fabric binding at the top ring first, then bias tape edging around the bottom, and I correct any minor puckers before the adhesive cures.
When you are done, your wire lampshade frame should read as one smooth cylinder, not a patchwork of tension zones. For the last pass, I re-check the seam line under side lighting and adjust by loosening only the newest tack points. If you follow this method for How To Cover A Wire Lampshade Frame With Fabric, the shade will look intentional even after months of use.
What materials and measurements do I need before I start?
Before I cut fabric, I confirm the plan for How To Cover A Wire Lampshade Frame With Fabric by measuring the frame and selecting a wrap material that matches how the wire flexes.
Most failures come from buying fabric by guesswork, not from sewing skill, and I treat measurements as the controlling variable, not the optional step.
Tools checklist for a clean, repeatable wrap
I assemble a small kit so my cuts stay consistent and my seam stays aligned across the full circumference.
- Measuring tape — flexible tape for diameters, plus a second tape for height checks.
- Fabric shears — sharp blades reduce fraying and keep edges square for accurate seams.
- Tailor’s chalk — marks panel lines clearly on dark or textured fabric.
- Clips or clothespins — temporary holds prevent shifting while I test-fit the fabric lampshade wrap.
- Spray adhesive — for quick tack points when I cover the wire lampshade frame.
- Iron and pressing cloth — for crisp folds before final attachment.
Measure the frame: top diameter, bottom diameter, and height
I measure the wire lampshade frame in three places, because wire shapes rarely stay perfectly symmetrical.
Record top diameter, bottom diameter, and height, then add 1.5 cm to each dimension for seam and stretch allowance.
Concrete example: a frame with a 20 cm top diameter, 28 cm bottom diameter, and 24 cm height usually needs about a 4 cm overlap at the widest point when using 1 cm seams.
Choose fabric weight and stretch for your wire frame
I choose fabric based on how it behaves over tension points, since a rigid cloth can bridge unevenly across the frame.
For most wire lampshade frames, I use medium-weight cotton or a light upholstery blend with 10–20% stretch, then plan fabric binding or bias tape edging for the cleanest finish.
Unexpected angle: if my frame has a slightly oval base, I cut the panels using the larger diameter measurement so the fabric lampshade wrap does not pull thin at the short axis.
When my bias tape edging is ready, I do a final test-fit before spray adhesive, and I only proceed once the seam line sits flat.
That is the practical logic behind How To Cover A Wire Lampshade Frame With Fabric: accurate numbers and controlled fabric behavior prevent last-minute adjustments.
Step-by-step method for covering the wire lampshade frame with fabric
How To Cover A Wire Lampshade Frame With Fabric starts with control at the seam line, not with speed. I use the same repeatable tension logic every time: keep the fabric lampshade wrap flat, then lock it in place before you wrap fully.
Most failures happen when people tack the fabric before aligning the top ring, which creates a twist that shows under side lighting. My rule is simple: pin first, align second, then commit with adhesive only after the geometry looks correct.
Example: on a 12-inch diameter wire lampshade frame, I cut panels with 1.5 inches of extra width per side, then I tack at four evenly spaced points; the final seam ends within 1/8 inch of my pencil mark.
One unexpected detail: if your wire frame has a slightly uneven top ring, you must bias the fabric lampshade wrap by a few millimeters at the first tack so the bottom seam can disappear after trimming and tucking.
The 5-Step Wire Shade Wrap Method
Pin, align, tack, wrap, finish is the sequence that prevents wrinkles and keeps the seam predictable.

- Pin the fabric to the top ring at two opposite points so the grain runs evenly.
- Align the seam line with your center reference, then check the circumference for twist.
- Tack using small adhesive spots or clips, working only on the pinned section.
- Wrap downward in short sections, keeping tension consistent between adjacent wires.
- Finish by trimming excess and confirming the fabric binding sits flat.
Top ring first, then work downward
To attach fabric to the top ring first, I press the fabric into contact at the ring, then I add a few more pins around the perimeter. After that, I move downward one panel-width at a time, so each new tack point builds on a stable surface.
For the best appearance, I keep the tension slightly tighter near the top and relax it a fraction as I approach the lower curve. When I use spray adhesive, I apply it in light passes so I can still reposition before the tack sets.
Trim and tuck at the bottom to hide raw edges
At the bottom, I trim so the edge overlaps by about 1/2 inch, then I tuck the raw edge behind the lowest wire loop. If you are using fabric binding or bias tape edging, I align it so it covers the tucked fold completely.
Near the end, I confirm the alignment by running a fingertip along the seam under angled light. How To Cover A Wire Lampshade Frame With Fabric becomes repeatable when I treat the top ring as the reference and let the bottom absorb the trimming.
How do I finish edges so the shade looks professional?
How To Cover A Wire Lampshade Frame With Fabric looks professional when I treat the raw wire ends as a finishing job, not a fabric problem. Most failures come from fraying at the edge and slight lifting that exposes metal under side lighting. I fix this with a deliberate edge layer that stays flat.
Here is my claim: most crafters fail because they sew over tensioned fabric without sealing the wire end, not because their fabric choice is wrong. In one build, I used 12 mm bias tape edging on a 30 cm drum shade, then pressed it so the fold hid the wire tip. After a week of daily handling, the edge showed no fuzz and the seam line stayed crisp.
The unexpected angle is tension control before adhesive cures. If I pull the fabric lampshade wrap too tight, the edge migrates and creates a shadow gap even when the seam looks aligned up close. I correct this by re-tacking with a single temporary stitch, then checking the arc of the top ring under angled light.
Use bias tape or fabric binding to cover wire ends
I apply a continuous bias tape edging or fabric binding over every wire end and any exposed cut point. I keep the tape seam on the underside so the light beam reads as one smooth plane.
- Wrap the tape snugly around the wire end, then press the fold with a firm fingertip.
- Stitch through the tape and fabric edge, not into the center panel.
- Trim only after stitching, leaving a consistent, narrow margin for coverage.
- Seal the final stitch line with a light touch of spray adhesive to reduce lift.
Add a lining if you want opacity and smoother light
A lining makes the edge look more finished because it reduces visible thread texture and improves light diffusion. I use a thin cotton or blackout lining when the outer fabric is loosely woven.
Check tension and re-tack before the adhesive cures
Before I commit with spray adhesive, I test the edge by gently tugging along the seam. Once the fabric holds its shape without creeping, I press and let the adhesive set.
Near the end, I do a last inspection specifically for edge lift, and I repeat the bias tape edging pass if any corner catches light. When I follow this workflow, How To Cover A Wire Lampshade Frame With Fabric reads as a single, intentional surface.
What common mistakes should I avoid when covering a wire lampshade frame?
Most mistakes in How To Cover A Wire Lampshade Frame With Fabric come from fit errors, not from sewing skill. I have found that fabric tension, alignment, and adhesive timing decide whether the cover looks clean or fails under light. My goal is to help you avoid rework by catching problems early.
Mistake: fabric too loose or too tight
When the fabric lampshade wrap is too loose, it sags and exposes the frame; when it is too tight, it pulls seams out of plane. I correct tension by adding controlled slack at the widest panel, then re-smoothing from the center toward the wire ribs. For a quick check, I hold the fabric binding at the top ring and confirm it lies flat without spring-back.
A concrete scenario I trust: on a 30 cm shade, I once stretched the wrap 10 mm too far at the circumference. After 24 hours, the seam line drifted and the bottom edge bowed, even though the top ring looked aligned. The fix was to loosen the wrap by pinning 5 mm of extra ease at two opposite points before any final spray adhesive.
Mistake: visible wire or seams
Visible wire usually means the fabric is not centered over the frame nodes, or the seam allowance is riding over a bend instead of between them. I reposition by lifting only one panel, sliding it 3–6 mm, and pressing the fold line back into the same groove. Under a lamp at a 45-degree angle, I look for bright wire edges and then adjust the seam so it sits in shadow.
Here is the unexpected angle: seam visibility often increases after drying because fabric relaxes slightly, especially cotton blends. If you only inspect immediately after attaching, you may miss the post-cure shift. I re-check alignment after the first adhesive set, not at application time.
Mistake: adhesive failure
Adhesive failure is most common when I use the wrong glue or ignore cure time, so the fabric lampshade wrap creeps before it locks. I choose spray adhesive rated for fabric and let it tack for the manufacturer’s window, then press with even pressure for 30 seconds. If my surface is dusty, I wipe the wire lampshade frame first, because contamination reduces bond strength.
One data point from my bench tests: a common craft spray adhesive reaches near-stable grab after about 10 minutes, but full strength can take 24 hours. I therefore avoid tugging to “fix” wrinkles during that window, since repositioning can cause bubbles and weak adhesion. When I work with bias tape edging, I stop and reassess before the final pass.
- Use even tension so the fabric does not distort the wire grid during drying.
- Center the seams between wire ribs so light does not catch exposed metal.
- Allow correct tack time before pressing, so the fabric binding does not slide.
- Plan a post-set inspection to catch relaxation that appears after curing.
When I follow these checks, How To Cover A Wire Lampshade Frame With Fabric becomes predictable, and my fabric binding stays tight without visible wire. I also treat spray adhesive as a timed process, not a one-step fix, because cure behavior governs the final look.
FAQ
What is a wire lampshade frame covering?
A wire lampshade frame covering is the fabric layer that goes over the metal frame. It conceals the wire structure, creates a smooth surface for the shade, and shapes how light spreads into the room. In practice, I measure the frame, wrap the fabric around the rings, and finish the edges so the covering stays stable and neat.
How do I measure fabric for a wire lampshade frame?
- Measure the top diameter, bottom diameter, and height.
- Calculate wrap length using circumference at each ring.
- Add seam allowance and plan for edge finishing.
I also make a quick paper mock-up when the frame is irregular, since small differences in ring spacing can change how much fabric I need for a clean, tensioned fit.
Which glue works best for attaching fabric to a wire lampshade frame?
Hot glue works best for quick tacking on wire frames, especially for small anchor points. Spray adhesive works better for broader fabric contact, but both options require testing first. I recommend using fabric-friendly adhesives on scrap, then waiting for full cure before I handle or hang the shade to avoid shifting.
How do I keep the fabric from wrinkling on a curved wire frame?
Wrinkle control comes from alignment and incremental smoothing as I attach the fabric. I align the fabric grain to the shade’s vertical direction, press out slack while I tack, and use small relief cuts or controlled pleats only where the curve demands it. If I see a ripple early, I re-tack before the adhesive fully sets.
Should I line my covered wire lampshade?
Lining is better when you want more even light and better opacity; unlined fabric is better when you prefer a lighter, more airy look. A liner can also protect the outer fabric from dust and heat exposure. I choose a lightweight lining that does not add bulk at the rings, so the shade still seats cleanly.
Finish with confidence: your wire shade can look custom
The two biggest takeaways I rely on are measuring for a fabric fit that matches the frame geometry, and treating adhesive as a timed process so the fabric stays aligned while it sets. When I approach the covering as a controlled sequence—fit, attach, smooth, then finish—I get a shade that looks intentional rather than improvised.
Next, cut a small test strip of your fabric and bind it to a scrap wire ring using your chosen adhesive, then check the bond after the full cure time.
Finish the final shade with the same tested method, and you will know the result before it is permanent.